Tuesday 20 May 2008

40k 5th Edition

Here are some notes on the upcoming 5th ed. rules, including a link to a torrent download of the pre-release rulebook: Samurai Gunslinger

I must say that I am facing this rule change with some trepidation. Mostly for the rumours about nerfing the Necrons gauss weapon ability. It seems that the ability to fluke a lucky vehicle kill via a glancing shot will be removed and the troops need to wear down a vehicle - one weapon at a time.

Ick. Yuck. Barf.

With the new rules vehicles like the Falcon will take 5 or 6 rolls of 5 or 6 to take down. That is a massive difference and I hope, but seriously doubt, that the point cost will be adjusted accordingly. The choice of high S weapons is pretty limited as I recall (codex not at hand), to the Heavy Destroyer and the Monolith.

I am yet to figure out what the effect will be on my growing Chaos army. But with the vehicle changes I expect something nasty to happen to the dakka predator I was planning. For reference a Dakka Predator (from Librarium Online):

Predator w/ AC + HB Sponsons + Havoc Launcher

Here we have the “dakka” predator. Capable of spewing out enough hot lead to choke a horse. This thing is usually seen running beside two of its AT brethren in larger sized games, the enemy should be so focused on killing the AT predators that this should receive little to no attention.

With the new rules, any movement over 6" will reduce this torrent of horse-choking lead, possibly making other units like heavy weapon Chosen or Havoc squads more useful.

Monday 19 May 2008

Magic Wash - Pledge One Go

I have noticed that as a thinner, Magic Wash (Pledge) makes the paint flow beautifully. I also noticed that it leaves a slightly glossy (about semi-gloss I think) finish. Looks real nice on metallics, but probably a bit much on the non-metallics.

So I went searching for flat coat choices to both protect the miniatures and make them look realistic. The popular choice seems to be Testor's Dullcote. As a lacquer there are some concerns about it yellowing over time. Other people recommended PollyScale Flat and something similar from Model Master. The lacquer based sealers use a thinner that can be harsh on acrylic paints, especially silver apparently, which is a bit of a concern.

Unexpectedly my searching turned up a technique based on Future (known as Pledge here). The idea is to mix a matt medium, such as Tamiya X-21 (get it from Toyworld) to make the normally glossy Pledge flatter, leaving a tough, flat finish. Remember that despite all this modelling fun, Pledge is meant to be tough enough to be walked on.

A number of different finishes are possible, just my varying the amount of flat base used:
  • dead-flat: 1 part X-21, 3 parts Pledge
  • flat: 1 part X-21, 10 parts Pledge
  • satin: 1 part X-21, 15 parts Pledge
  • gloss: Pledge (what else :)
I am really impressed with the apparent flexibility of Pledge as well as it cost - available from Coles or Woolies for less than $6 for 500ml. How good is that?

For reference here are some links:
The Complete Future - a great reference. Includes an image of the bottle (centre bottle).
Future Floor Wash - as used by a railroad modeller.

Sunday 18 May 2008

Partial Painting Results

Well I started testing the new painting techniques on a guinea pig Raptor (everyone else took one step back).

The first picture is of a brush primed Raptor next to a "raw" Raptor. This was obviously more time consuming to actually paint on than a spray can, but because it is water based it can be painted on much sooner. Especially if you have access to a heat gun! :)

I thinned all these paints with a magic wash, which worked well. Still getting the feel for appropriate dilution - not sure I agree with the TAB Studio video - yet. The primer covered in three coats - and that means about 3-4 drops of primer. The difference is a bit hard to see - it is bit more obvious in the flesh (metal?).


Left is the basic marine and on the right is the brush primed model.

After the primer dried I started working on the metallic armour for the Raptors. The colour is Dwarf Bronze and I thinned it down in the TAB Studio way - about 10 drops of magic wash to a drop of paint. I though this was so thin it was completely useless - I swear I could count the mica flecks after I had done a coat. I figure that this due to a difference in pigment content in GW versus the Vallejo paint in the video.

I used a thicker wash than before and proceeded to carefully wash on thin coats of the bronze. Between coats I hit the model with a heat gun to drive out the water, speeding up the process. Even with the thickened wash the results below took a fair while and about 7-8 washes.

Time consuming, but a very smooth result.

Here are some pictures of the test piece. Note the highlights on the armour. How cool is that? :) Stoked in short.

Front view of the Raptors armour

Rear view of the Raptor.

I am a convert, and intend on using this technique further including normal non-metallic paints. Stay tuned...

Saturday 17 May 2008

New approach to painting

The brush on primer mentioned above is white (Vallejo have one). I have been an advocate of black on the 28mm sized figures since the beginning, but the latest round of metallics have been disappointing (note that the silvers work like a bought one). So with all that I am going to give the brush on primer a try.

The challenge will be to ensure that all areas get some sort of paint. Missed areas on a black primed model look like deep shadows. Missed areas on a white primed model really stand out and look, well, shit. The other trick will be in getting the darker "scale" colours and grungy feel you get for free with black undercoats. It will really be a matter of darkening paints accordingly, which will require some work on palette mixing. Cool.

I should that my 15mm work gets a white undercoat followed by a brown shadow wash, so this won't be all new. It will be a challenge but I am sick of fighting with red, white, yellow and the non-silver metallics - so here I go...

Painting Videos

After complaining about painting metallic golds in a recent post, I got referred to a video tutorial series.

All in all very good.

Highlights for me were:
  • Use of "magic wash" as a paint thinner instead of straight water. This wash is one part acrylic floor wash and three parts water. This is supposed to help with keeping the metallic flakes in suspension, instead of lying about on the bottom.
  • Undercoating with an acrylic brush on primer. The basic idea was that spray cans while much faster can produce inferior results due to temperature and humidity. I have seen a powdery finish due to the paint drying in the air and an uneven finish due to high humidity.
Here are some links to the series. The home website appears to have gone AWOL, so these links are all to blip.tv, but the videos come from TAB Studio.
They can take a while to download and the client does not appear to buffer at all. So I suggest some manual buffering - leave it on pause until fully downloaded.

Friday 16 May 2008

The Big Kahuna

After doing some assembly on my Raptors (pictures as they get painted) I kept rolling and assembled the Daemon Prince.

The assembly was harder than I expected. The model came in thirteen metal parts, including a front and back torso. Nothing seem to fit quite right and in some cases the contact surfaces for gluing were pretty small, which is not good for superglue. I thought I was pretty proficient with pinning but I was stretched with this model - and improved my technique.

The front torso was pinned in place simultaneously with 5 pins. This was not for fun. One for each arm, one for the waist post and two for the body. Getting that precisely lined up was tricky. In short I put all the pins in one side, aligned them all carefully and drilled some over-sized holes in the other side and jockeyed it carefully into place.

Once assembled it was obvious that a fair bit of filling was going to be necessary. A few hours later I had bogged up:
  • left and right torso joins
  • left and right armpit/shoulder joins
  • top torso join
  • waist
  • hip
  • head and neck
  • wrist
  • exhaust pipe thingies on the shoulders.
I think that this kind of lack of quality with the assembly is really is pretty poor form when you consider the premium price paid for the figure. Shame on you Games Workshop.

The figure comes carrying a sword, but since I had equipped my Prince with the Lash of Submission ability I decided to give him a physical whip. Rather than butcher the hand with the sword I carved a new hand for him holding the handle of the whip. The handle is a section of styrene tube that I formed the fist around. The handle will be trimmed to size and detailed further, including the addition of the lash and tails of the whip.

This is my first attempt at carving anything at all and I must say I am pretty happy with the result. The fist is larger than the original, but seems to fit the model really well. His thumb is a bit deformed looking, but rather than make it worse I decided to just leave it as is.

The big ticket item remaining with this figure is the creation of some wings. I found that wings were really useful for this guy in play testing, so now I need some way to model them. I have been studying the structure of bat wings (the things we do!) and figure I will make the bones out of a few different sizes of styrene tube. The skinning of the wing is still a bit of an unknown at the moment.

I initially wanted to have his wings at full extension like he was had just landed or was about to take off, but figured that this would always be banging into terrain, so I figure now that he will have his wings furled up at rest.

Back to Games Workshop again: why can't a company that insists on WYSIWYG modelling actually supply all the options for the models? Even old models could have some add-on bitz. How hard is it?

Here are some photos for this stage.

The Prince with one of his marines for size comparison.


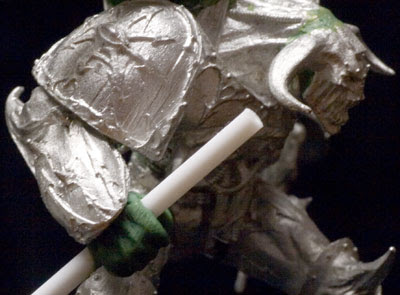
Close up detail of the new hand.

Monday 5 May 2008

Class Photo - Royals

The first Chaos warband has been completed - the Royals.

A group that considers themselves a notch above the rest, they have adopted a regal colour scheme, including gold leaf, to demonstrate their superiority.

They have turned out pretty well, but the gold metallic was a pain, and I am totally over it. These paints are built on a yellow base which doesn't cover well and the metal particles are quite large. There wasn't a lot of room to swing the brush properly for dry brushing, so I tried washing the metallic on, but it was too easy to get it wrong. If I was not careful the paint got a bit thick and grainy looking, which was/is super irritating.

You will notice that there are two bases with gold edges in the photo. The right-most one is the results of 4 or 5 washes of Burnished Bold. Looks pretty good in the photo? In real life it looks grainy. Frustrating.

So the search continues for the master class technique for painting golds (and brass, bronze, etc).

The Royals. A Plasma Gunner Warband